Migrating your MVC app to .NET Core
Migrating your MVC app to .NET Core
By Florent T. |Posted on 11 February, 2019
Introduction
Last week version 3.0 of .NET Core was released in preview. It brings with it the ability to create WPF applications (not cross-platform for the moment) and also compability with Entity Framework 6.
.NET Core benefits from more frequent updates in comparison to the classic .NET technology which means that .NET Core should be prefered above .NET for new projects.
In this blog post we'll see how to migrate an MVC web application developed with the classic .NET to .NET Core. The process is relatively simple, you need to create a .NET Core application ready to host the different files of your MVC application (controllers, views, etc.). There are just a few differences in the configuration of your application that we will see further in this article. A developer experienced in the development of classic MVC applications won't have any problem to develop in .NET MVC Core. The following steps should allow you to migrate your application to .NET Core.
- STEP 1 : Create your .NET Core application
- STEP 2: Configure the DbContext class
- STEP 3: Import your files
- STEP 4: Define a 404 and 500 error page
STEP 1: CREATE YOUR .NET CORE APP
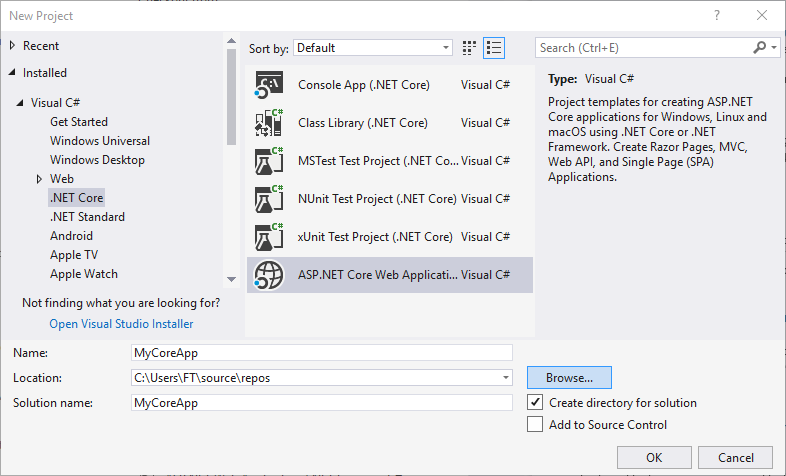
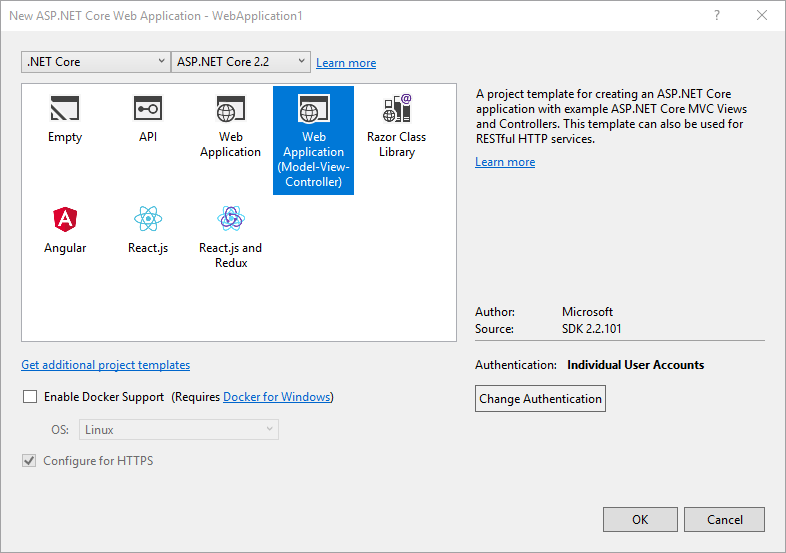
Create a new project and choose .NET Core web application. Then choose "MVC".
NOTE : Choose for the corresponding authentication settings. In this example we will use "Individual User Accounts". Thanks to the built-in "Identity" methods we'll be able to create users and eventually assigning them roles (Admin, publisher, ...).


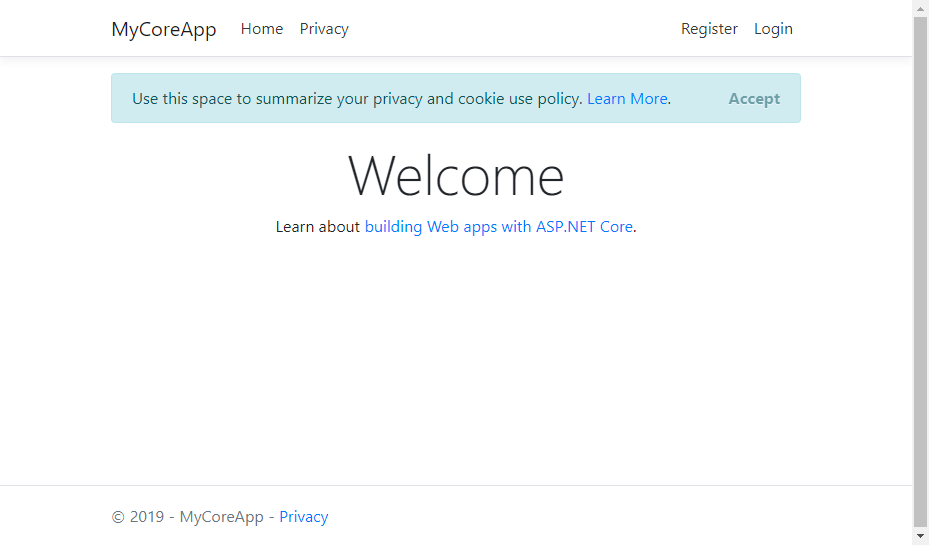
Try to execute your program and check if you are able to obtain the result below.

STEP 2: CONFIGURE THE DBCONTEXT CLASS
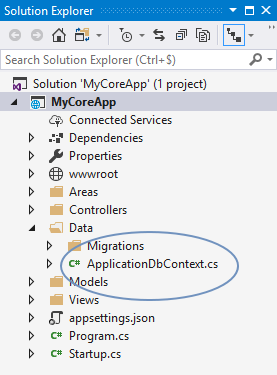
The DbContext class is slightly different. (Note that we use the "code-first" approach and migrations to generate our database. For more information about this click here.)
This class will inherit from the "IdentityDbContext" class (only if you use authentification). This will load tables for authentification into your database in addition to your own tables (here in this example employee and customer). Finally specifiy your connection string (marked below in yellow). The web.config file isn't present anymore.

|
public class ApplicationDbContext : IdentityDbContext { public ApplicationDbContext(DbContextOptions<ApplicationDbContext> options) : base(options) { }
public virtual DbSet<EmployeeViewModel> Employee { get; set; } public virtual DbSet<ManagerViewModel> Manager { get; set; }
protected override void OnConfiguring(DbContextOptionsBuilder optionsBuilder) { optionsBuilder.UseSqlServer(@"data source=(LocalDb)\MSSQLLocalDB;initial catalog=Queaso;integrated security=True;"); //IMPORTANT!!! }
public ApplicationDbContext() { }
protected override void OnModelCreating(ModelBuilder modelBuilder) { base.OnModelCreating(modelBuilder); //add index to EmployeeViewModel modelBuilder.Entity<EmployeeViewModel>() .HasIndex(i => i.Id) .IsUnique(); //add index to ManagerViewModel modelBuilder.Entity<ManagerViewModel>() .HasIndex(i => i.Id) .IsUnique(); } }
|
STEP 3: IMPORT YOUR FILES (CONTROLLER, VIEWS, ...)
Controllers, Views and Models need to be added to your new project. Copy / paste your files to the corresponding directories. They will appear automatically in Visual Studio.
STEP 4: DEFINE A 404 AND 500 ERROR PAGE
We will see how to customize two of the most common errors encountered in web applications:
- 404 Page Not Found Error
- 500 Internal Server Error
Because these types of errors are very common, it is important to foresee an appropriate response towards your users. Open the Startup.cs class and implement the following code in the Configure () method.
|
// This method gets called by the runtime. Use this method to configure the HTTP request pipeline. public void Configure(IApplicationBuilder app, IHostingEnvironment env) { //HANDLE 404 PAGE NOT FOUND app.Use(async (ctx, next) => { await next();
if (ctx.Response.StatusCode == 404 && !ctx.Response.HasStarted) { string originalPath = ctx.Request.Path.Value; ctx.Items["originalPath"] = originalPath; ctx.Request.Path = "/error/404"; await next(); } });
if (env.IsDevelopment()) { app.UseDeveloperExceptionPage(); app.UseDatabaseErrorPage(); } else { app.UseExceptionHandler("/error/500"); // The default HSTS value is 30 days. You may want to change this for production scenarios, see https://aka.ms/aspnetcore-hsts. app.UseHsts(); }
app.UseHttpsRedirection(); app.UseStaticFiles(); app.UseCookiePolicy();
app.UseAuthentication();
app.UseMvc(routes => { routes.MapRoute( name: "default", template: "{controller=Home}/{action=Index}/{id?}"); }); } |
Then implement the necessary code into your controller. In this example I named my controller "ErrorController" and created two views "InternalServerError500" and "PageNotFound404".
|
[Route("error")] public class ErrorController : Controller { private readonly TelemetryClient _telemetryClient;
public ErrorController(TelemetryClient telemetryClient) { _telemetryClient = telemetryClient; }
//CUSTOM EXCEPTION PAGE [Route("500")] public IActionResult InternalServerError500() { var exceptionHandlerPathFeature = HttpContext.Features.Get<IExceptionHandlerPathFeature>(); _telemetryClient.TrackException(exceptionHandlerPathFeature.Error); _telemetryClient.TrackEvent("Error.ServerError", new Dictionary<string, string> { ["originalPath"] = exceptionHandlerPathFeature.Path, ["error"] = exceptionHandlerPathFeature.Error.Message }); return View(); }
//CUSTOM 404 PAGE [Route("404")] public IActionResult PageNotFound404() { string originalPath = "unknown"; if (HttpContext.Items.ContainsKey("originalPath")) { originalPath = HttpContext.Items["originalPath"] as string; } _telemetryClient.TrackEvent("Error.PageNotFound", new Dictionary<string, string> { ["originalPath"] = originalPath }); return View(); } } |
Finally implement a custom 404 page (view) that you want to return to the user.
For example, try to enter an invalid url on the queaso website e.g.: https://queaso.be/thisisatest. You should see the custom 404 page of Queaso.
Questions ? Contact us via the contact form here.
See you soon !
Queaso Systems is hiring! Have a look at our career opportunities at Queaso Systems by clicking here and why not join us?